Soldering Arcade Control PCB's
Although I don't consider myself an expert at soldering I'm going to attempt to explain some basic soldering techneques and outline some of the problems you may run into. This is in no way a complete guide on soldering. That said, here's a little of what you can expect while making your connections.Prepare the connections
Some gamepad's have a black material over the button connections. If this is the case you'll need to scrape a hole through this to expose the metal underneath. In any case make sure the connections are clean before you do any soldering.
Connections? What connections?
If your working with a board not explained here (or elsewhere) you may be wondering how you can figure out what to solder to. It's not too hard if you know what to look for. Your arcade controls are nothing but switches that connect two wires together when pressed. One of these wires is Ground (a.k.a. Negative), the other is specific to whatever control it goes to. Almost all gamepads have one Ground (the only exception I know of is the DreamMaster). So anytime something is connected with Ground, it's activated (i.e. connect Up to Ground and Ryu jumps). Before you took appart your gamepad each button simply made a connection between something specific and Ground when pressed.
So if you look at any button you'll see two connections. One is Ground, the other is specific for that button. The trick is figuring out which is which. Well everything shares the game Ground. By finding the connection that also goes to another button you can figure out which is Ground.
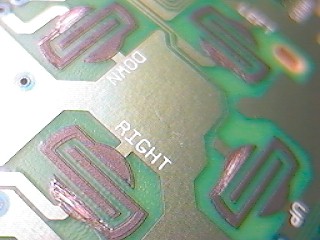
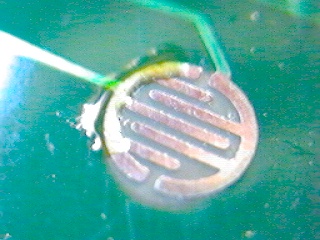
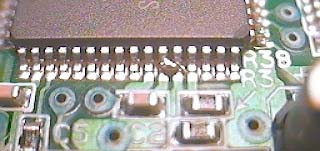
By now your either nodding your head or confused. If you look at the top image you'll notice the connections where the words "DOWN" and "RIGHT" are part of the same hunk of metal. Those are both Ground (that hunk of metal goes to a connection for every button on the board). So the other connections are the ones specific to those buttons.
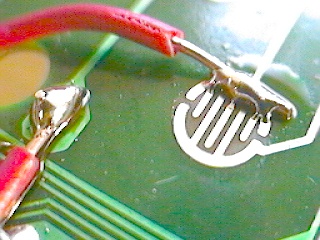
So where should you connect your Ground wire? Well, any of those ground connections will do. In the case of the board shown in these two images it's more easy to connect to the hunk of metal since it's a large surface. You'll see in the 2nd image where the board has been scraped away to expose the metal. You'll also notice that both "Y" and "B" connect to this metal which confirms those are all Ground.
Basic steps of soldering
First thing to do is apply flux to the connection. Flux is like magic snot that commands where the solder goes. Although it's possible to solder without flux, I highly recommend you use it. Your not soldering little parts to the board but long wires that will take a lot of stress over the life of your controller. It's important that all of your connections be as solid as possible.
There isn't a huge rush to solder once this stuff's been applied. It's not going to harden up any time soon so if you want to flux a few connections at a time that's alright.
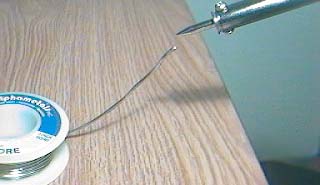
Next thing to do is "tin" the tip of your iron. All this means is your putting some solder on the tip. This can be done by simply brushing the tip of the iron against the tip of your solder.
If your using threaded wire (which I recommend since it bends easier) you may also want to tin the tip of the wire to bond all of the threads into one. Do this by brushing the tinned tip of your iron on the wire.
Hold the wire in position. Make sure it has good contact with the flux.
With the iron heat the joint by lightly pressing it it against the wire and the contact at the same time. It's very important that you heat both.
Depending on how much metal is being heated the time it takes can very from less then a second to a few seconds. Most of the connections you'll be making should be fast. You should see the solder react immedietly to the flux once the iron makes contact.
Once the liquid solder is in place remove the iron. Your not done yet, and this is were many problems happen. There's a cooling time. It's short but it's there. It's possible to screw the joint by moving the wire during this time. After about a second or two you'll see the solder solidify.
Once the join is solid, give the wire a light tug to be sure the connection is secure.
Clamps
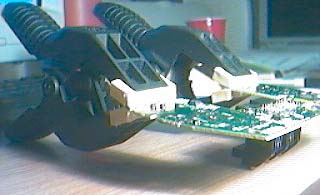
To aid in your soldering adventures you may want to get some clamps. Alligator claps are great for holding wires in place.
Depending on the type of gamepad you may also want to use some bigger clamps to hold your PCB in place (Sega DC Gamepad shown).
If you got a friend standing around, make him hold stuff too. Just keep in mind wires can get hot while soldering. Your not going to loose a finger or anything, just be warned.
Damn those balls
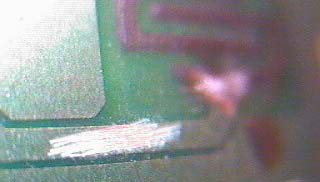
At all times keep an eye out for stray balls of solder that end up on your PCB. The image here shows a common scenario. This is why it's extremely important that you do not have the controller plugged into the console while you work. A short like this can be devastating. At the least it's going to cause unpredictable stuff to happen (buttons pressing themselves, acting as multiple buttons, etc), at worse something on the board or in the console itself could fry because there's parts of the controller with higher voltage then others. Something like this can cause that voltage to visit neighboring parts that can't handle it.
Oh shit! Now what?
So you've mangled a connection. This is generally caused by overheating.
Sometimes you have to throw in the towl and relocate your business. Depending on the PCB you may have this option.
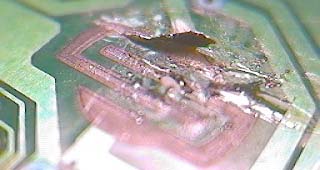
Follow the lead that goes to the connection and see if it goes to anything that would be easy to solder to. A good example is shown here. Another part is connected to this lead (the part's on the other side of the board). This connection can be easily soldered to.

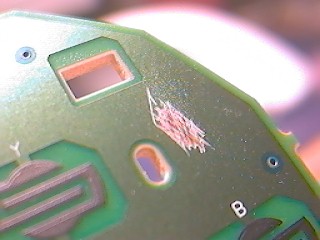
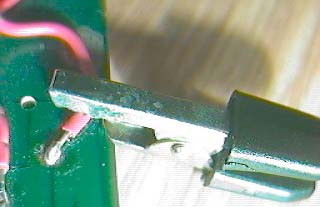
Another option you have is to scrape away a part of the lead to expose the bare metal. If it's a very thin lead you may be out of luck (not strong enough to withstand stress over time, or it may not handle the heat when you solder to it). This image shows an example of a good time you can do this.